Matthew 6: 10
"Thy kingdom come, Thy will be done on earth, as it is in heaven."

Search
Close this search box.

Clothing Manufacturing

clothing manufacturing process

Clothing Manufacturing Process : 14 Steps of Garment Manufacturing Process in 2024

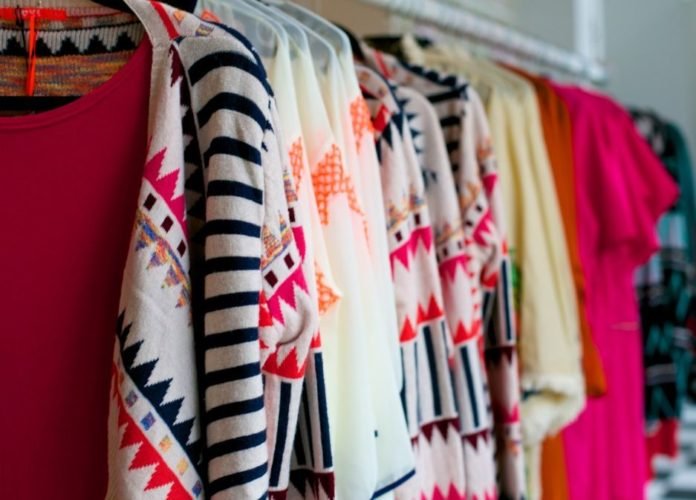
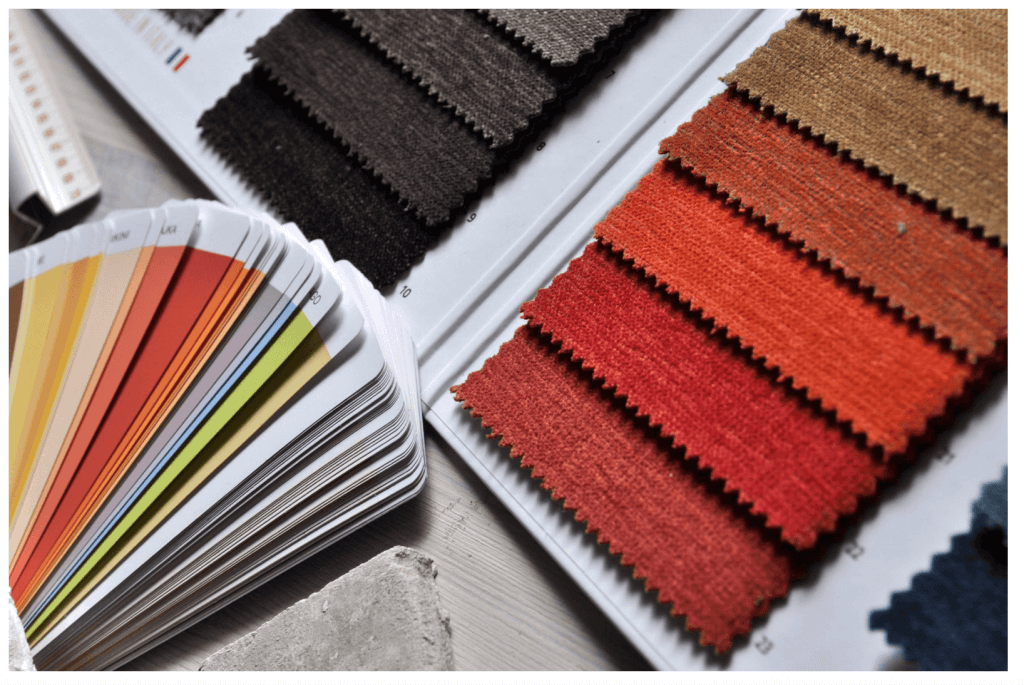
Every newcomer in the fashion industry must have to know about the clothing manufacturing process. Most importantly, if you are starting your own clothing line, you should learn details regarding the clothing manufacturing process. Often individuals get perplexed by the garment production process. So, before you start learning about product creation and garment manufacturing, it’s a good idea to get a broad overview of all the phases involved in the clothing manufacturing process.  Now, let’s have a look-  1. Inspiration Shopping The Vintage Show is a great place to start if you’re seeking for design ideas. The Vintage Show has an incredible Instagram feed and hosts vintage apparel trade shows all over the world. Find a vintage garment that hasn’t been sold in stores for at least 20 years and make no adjustments. 2. Garment Design If the garments find that inspires you, we’d recommend purchasing them if they’re not too expensive. Instead, look for something similar but less expensive on eBay, Postmark or other  apparel outlets. Hiring a graphic artist to draw out the Franken outfits  would be a good option. 3. Print + Color Design           After that, there is print and color design to consider. Is your collection going to be all sold colors, or will you use a variety of prints? Will you combine the two and do a little of each? Simply googling is one of the simplest and cheapest ways to predict color and print trends. 4. Source and order fabric + trim  Fabrics should be chosen to complement the garment’s design. A Fabric Data Sheet contains all of the necessary fabric information for a factory to produce your garment. Make sure you acquire an FDS once you’ve chosen your fabric. You can start looking for fabrics and trim after you know how your garment will look. Some important factors to consider –  CONTENT OF FIBER The percentage of different fiber types in the cloth TYPE OF FABRIC WEAVE OR KNIT Plain weave or 3×1 twill for woven fabrics, and jersey for knit fabrics are examples. SIZE OF THE YARN The yarns’ diameters DENSITY OF FABRIC Yarns per inch (YPI) or stitches per inch (SPI) for wovens and knits, respectively. MINIMUM ORDER QUANTITY SAMPLE (MOQ) In a sample order, what is the smallest amount of cloth you can order? VALIDITY DATE AND SAMPLING PRICE What is the cost, and for how long is it valid? As the market changes, so do prices.     AN EXAMPLE OF LEAD TIME How long does it take to acquire a fabric sample? BULK ORDER MINIMUM QUANTITY (MOQ) For the bulk price, how much fabric do you need to order? VALIDITY DATE AND BULK PRICE When you place a bulk purchase, how long will it take to produce and transport your fabric? SPECIAL TREATMENTS OR FINISHES Washing, waterproofing, softening, and other services are available. 5. Tech Pack A tech pack is essentially your garment’s blueprint. It instructs the factory on everything from the sort of cloth to use and the color to use, all the way down to the sewing machine thread. It details where to obtain labels and hang tags, as well as how to pack and ship the item.         6. Preliminary Costing Don’t be afraid to be open and honest with your supplier about pricing. Many new brands believe they will just develop and then begin negotiations when it comes to the time to produce.  7. Pattern Development The first step is to create a pattern that will be used to cut the fabric. Some firms choose to collaborate with a local sample maker who can create designs and samples close to their location. Beautiful Connection Group is a clothing manufacturing company who can make any kind of customised clothing item.  8. Development Sampling It’s now time to make the sample. The sampling procedure is divided into five steps. Lab dips and strike offs are used to approve the colors and prints before sample fabric is made. Always make sure to get a swatch, and approve it. If you don’t like the way your color or print looks, this is your moment to speak up.  A fit sample is an opportunity to check the pattern, and how a garment is going to ultimately look and fit. You can even take the sample and throw it on a fit model to see how it looks on a person.    A proto sample is also known as a production-quality sample. It is a sample that is made with your fabric, printed or dyed with your approved print or colors, and it is made using your approved fit sample. You will need it to make sure that it matches your production samples and production can run. An SMS is a SalesMan Sample. Some brands need from 10-20 sets of SMS samples. If you do not have a sales team there is no reason to make SMS. You can use your 1 set of proto samples for everything. It’s free and easy to give away. If a factory comes back to you with a much higher cost after sampling, run the other way. If a supplier increases the prices, it’s time to break up – but if they don’t increase their prices, that’s ok. 9. Pre-Production Process It’s time to go on to the production once you have your prototype sample and final costing ready. A lot of brands use this before manufacturing to take orders from retailers and specially if they are doing wholesale business. Alternatively, if they are selling directly to consumers, they may offer pre-sale opportunities.  10. Grade Patterns Your samples have only been made in the sample size up till now. The majority of brands provide a small or medium sample size. If you’re targeting plus-size customers, then, you might have to make your sample size the one that is the most selling.  You’ll need to grade your pattern once you go through into the production process. That is to say, the design will rise and decrease in size

Clothing Manufacturing Process : 14 Steps of Garment Manufacturing Process in 2024 Read More »

how to make stencils for clothing

How to Make Stencils for Clothing : Best Ways of Making Stencils in 2024

Stencils these days are very fashionable! Before knowing how to make stencils for clothing, you must have a clear idea what stencils are!  Stenciling is the process of creating patterns and designs on surfaces of basically in fabric, wood, etc. by using a thin cutout with holes through which paint is applied. First of all, let’s try to know a bit more regarding stencil… What is a Stencil? The term “stencil” refers to the thin cut-outs that are typically made of paper, plastic, or metal. The paint is placed via the holes (sprayed, brushed, or sponged) and the design is imprinted on the fabric’s surface. The design that is printed on the fabric is created by the holes in the stencil. When to use a stencil? You could have a design in mind that you’d like to paint on the fabric. But you’re not sure if you’ll be able to paint them in the same way over and over again without bleeding on the edges. This is where a stencil comes in handy.  In craft stores, you may buy ready-made stencils in a variety of patterns, designs, forms, and sizes, which you place on the fabric’s surface and paint with. However, you may easily make the stencils yourself once you learn how to make stencils.  You can discover your designs online or in books, customize them with your own adjustments, and then use them to create stencils. Nobody else would have the same style as you. Isn’t that fantastic? However, in order to get the designs printed precisely, you’ll need to make these stencils with extreme precision and perfection.  How to Find Designs for Stencils?   When it comes to stencil designs, the most important thing to remember is that they should have broad outlines.  Another key consideration is to select a design that does not have any separate details. It will be tough to create such details without having a joint to the outline, which may result in an appearance.  Designing a Stencil To avoid all of the problems listed above, make a preliminary sketch of the pattern you want in the form of a stencil. Further make sure that you cut away the inner side a bit and none of the inside’s sections come out separately. And if this is done, your design is ready to be turned into a stencil.  Ties are the internal connecting lines of the stencils. Your stencil will not be able to create a detailed design without the ties; they should not be too thin or too broad. However, wider ties are favored over narrower ties since thin ties will break or be covered in paint and will not show up in the finished product. You can make simple symmetrical stencil designs by folding your stencil material and then cutting it. Fold your fabric into a triangle shape in the middle first. To construct an easy stencil, cut out the inside portions of your folded material.  To make a reverse stencil, cut out from the exterior.  How to Make Stencils for Clothing  Masking tapes are the simplest stencils to make. Firstly you choose a design area. Then use masking tape to cover portions where you don’t want to paint, and then paint the outside. Stencils can be made from thin acetate sheets/see-through plastic sheets (transparent sheets used with overhead projectors) and are very durable. You can use them again and again. Alternatives include file covers (extremely thin ones), old x-ray sheets, and so on.  It’s ideal to acquire plastic sheets with a matt side and a glossy side since the matt side allows you to sketch with pencils and cut without slipping. And the matt side helps to keep the stencil motionless and steady when used on cloth.  Take a printout of the design you want to cut stencils from the plastic sheets and place it under the acetate sheet. Binder clips or tape can be used to keep them in place so they don’t move. Using a sharp exacto knife or blade to cut the sheet.  To make stencils, you can use any thick paper. Stencils can be made out of thick bond paper, old greeting cards, and other materials. For a symmetrical stencil design, simply fold it in half; mark the pattern on one side, and cut it out.  Another simple solution is to use freezer paper, which you can find in shops. These are sheets with one side of paper and the other side of plastic. You trace the design onto the freezer paper’s paper side and cut it out. The freezer paper stencil is then temporarily set in place as a stencil on the cloth, plastic side down. You can reuse this freezer paper stencil numerous times. If you don’t have any freezer paper on hand, you can make your own by gluing thin plastic sheets to regular printer paper.  Make a stencil out of lace. When used as a stencil, the complex designs of the lace are stunning. When working with lace, you’ll need to apply a temporary adhesive to adhere the lace to your cloth. To properly fill the stencil design, use an up and down motion with your stenciling brush. To construct a reverse stenciling design, you can utilize various found things that can be held flat on a surface, such as wonderfully formed leaves. Tips for Efficient Stenciling  When employing a stencil, make sure you’re using paint that doesn’t contain too much water. You don’t want paint to seep through the stencil’s outlines. The most effective method is to use a moderately wet sponge dipped in paint. You can use this sponge component to dab paint on the inside of the pattern. Unlike when painting manually, you don’t have to worry about outlines while using stencils. Instead of applying a thick coat of paint to the initial layer and leaving it alone, it is preferable to apply thin yet repeated layers of colors. Therefore you can apply the following layer after the first gets dried.

How to Make Stencils for Clothing : Best Ways of Making Stencils in 2024 Read More »

apparel production

Apparel Production : Terminologies of Apparel Production in 2024

Knowing about apparel production is the most necessary step before starting a clothing business. We are going to go through 10 fashion manufacturing terms that you should be familiar with if you’re going to start apparel production. Many people have trouble understanding terminology, especially if they’re new to the fashion industry. And it’s critical to know what your manufacturer is talking about and what you’re agreeing to. Don’t worry if you’ve ever been perplexed by apparel production terminologies.   Today we are going to go through 10 terms that are randomly used in apparel production. Let’s start … 1. Bulk Bulk, also known as “go to bulk” or “approved to bulk” refers to the completion of your sampling, satisfaction with the results, and readiness to move on to your main order. The ultimate order of your products is referred to as bulk. The phrase “go to bulk” or “approved to bulk” refers to you providing your approval to the factory. You’re indicating that you’re pleased with the results of the samples and are ready to commit to the final order. 2. CMT CMT stands for cut, make, and trim. And it’s the second term we are going to introduce to you. This means that the factory may cut out the fabric, stitch it together, and add any necessary embellishments, such as buttons, labels, zips, and so on. So if your estimated state is CMT only, it means the factory isn’t going to provide any of those fabrics, and you’ll have to source them yourself.  3. CNY  The next term is CNY, which stands for Chinese New Year. And you’ll hear it a lot if you work with Chinese suppliers or manufacturers. During the Chinese New Year celebrations, many industries remain closed for up to six weeks, and there are often delivery delays. Because they’re hurrying to finish everything before Chinese New Year, and because there are absolutely no boats or goods leaving China during CNY. After CNY, when everyone is heading back to work, many factories have concerns with employees not returning to work, resulting in a big problem that lasts for months. Despite the fact that the New Year’s Eve party is substantially shorter. This is something to keep in mind during the months of January, February, and March. The dates of the celebrations vary from year to year, though they usually fall around those dates.  4. Ex-Factory  The ex-factory date is the day when the majority of the product will depart the manufacturer. However, when it comes to delivery dates or interactions with your manufacturer regarding dates, you must be extremely clear about what you intend. In most situations, the ex-factory date will differ from the shipment day. Because you must account for the distance between the factory and the port, as well as the time it will take to travel by road. So make sure you understand exactly what’s going on with any delivery dates. Thus you don’t miss any shipping, freight, or other slots that you’ve scheduled.  5. FOB The number five is FOB, which stands for free on board, and this may show up when you get estimates from vendors. It usually indicates that both the cost of shipping the items to the nearest port and the cost of making the clothing are included. Fabrics are usually included in this. Do double-check, and we say this because that’s what it’s supposed to mean, but manufacturers have a habit of twisting quotes in their favor. As a result, you’ll have to double-check that the quote has everything itemized and comprehensive. It usually excludes the real delivery charge as well as any additional fees like taxes, import duties, insurance, and so on.  6. Grade Rules Grading, often known as grade roles, is number six. Grading is the difference in measurements between each size, and grade rules inform the factory how much of a difference there should be between each point of measurement and each size you’re making your range in. Now, your tech pack or spec sheet contains the grade guidelines. Further they’ll tell the factory what measures to use. It will be for each point of measurement, and they will differ between different styles and positions within that style. Make sure these are made specifically for each style, rather than being a hasty copy/paste job. Some of them will be the same, but they must be double-checked at each measurement point. This must be done manually to ensure that you account for all of the varied sizes you’re producing.  7. Lead-time The seventh factor is lead time, which is the time between when you confirm your order with the factory and when you receive the completed goods at the distribution center. This can be tricky once more. This can be tricky once again. As we previously stated regarding dates, the factory may list their lead time as when the order leaves them. In this instance, you must also speak with your courier or whoever is delivering your goods to obtain the true lead time from start to finish. And in many circumstances, you may need to contact a few different people in order to get that date.  8. MOQ The MOQ is the eighth item on the list, and it is the most important. If you own a small business or a startup, you’ll hear this all the time. It refers to the minimum order quantity, which will be applicable for a variety of items. So it may be the bare minimum of clothes that the factory is willing to produce, or the bare minimum of fabric that you can purchase, or the bare minimum of trims, labels, barcodes, bags, or whatever it is. By paying a premium, you can sometimes get around the MOQ. Obviously, this has a significant impact on your costs. Minimums will apply to almost every business you work with on a retail business to wholesale business. And while the minimums are sometimes manageable, such as 50 units or 50 meters of

Apparel Production : Terminologies of Apparel Production in 2024 Read More »

how to stretch denim

How to Stretch Denim : Denim Stretching Hacks in 2024

“How to stretch denim?” – this is one of the most common questions of the denim purchasers or denim users who purchase a wrong sized denim for themselves.  Denim is a durable cotton fabric with a modest diagonal ribbing pattern created by a twill weave. The weft threads go under two or more warp threads, and the warp yarns are more noticeable on the right side of the cotton twill fabric, which is warp-facing. Many people think that jeans and denim are the same but jeans and denim are not the same. Simply know that  denim is a fabric, whereas jeans are a garment. Denim fabric is used to create a wide range of garments, such as jackets, overalls, shirts, and jeans. Jeans are a type of garment that is commonly made from denim fabric.  Denims are all jeans, but not all jeans are denims. In a nutshell, jeans are made of denims, which are raw fabric materials made of 100 percent cotton twill that can be used to make jeans as well as a variety of accessories such as bags, shirts, skirts, and jackets. Jeans, by definition, stretch. We love them because the fabric is meant to morph and form to the body. Fabrics like spandex and lycra are elastomeric, letting them be figure-hugging but not as much as traditional denim.  Jeans are complicated beasts to make, and denim fabric can be expensive due to a variety of factors based on the type of cotton, any additives such as spandex/modal/rayon, etc., density of the weave, quality of the fabric, type of loom it’s woven on, location of the mill, and how the yarns are dyed. Denim in its purest form is raw or “dry” denim. The result is a rigid, durable fabric that is typically made of 100 percent cotton and left untouched after the dyeing and finishing process. Raw denim is available in two finishes: sanforized and unsanforized.    Jeans are fickle: they’re all cut differently, the wash affects the sizing even when you buy them from the same brand, and they fit differently every time you put them on depending on how you care for them. As a result of all of this, your old favorites may no longer fit properly. We’ve all been there, and it’s quite aggravating. Either the denim has stretched out a lot and the jeans are way too big, or it has shrunk down to a miniscule shadow of its former self and you can barely fit into them. In any case, it’s a huge letdown. Fortunately, there are a few tried-and-true solutions to the classic denim conundrum. With these six ingenious tips for shrinking or stretching jeans, you’ll be able to ensure that they always fit like a glove, no matter what style you’re wearing.  You must avoid over-washing your jeans and keep in mind when your jeans start to go baggy, you must hand wash your jeans with cold water and always try to avoid putting your jeans in the dryer where possible because it can stretch your jeans. Always store your jeans folded flat, not on a hanger to keep it more elastic. Try to always be concerned, how you are sitting. Because these sorts of materials get stretched easily and can become loose. Basically these are the cautions that you can measure to avoid unnecessary stretches of your fabric. But mostly, people want to know how to stretch denim. Since it is a stretchy fabric, many buy the wrong sized denim from themselves. They purchase either too small or too large sizes that they keenly want to know how to stretch denim. Because, by stretching it  they can make their denims a comfortable and wearable one! So, now let’s discuss how to stretch denim with the best hacks in details:  If the Jeans Are Too Big    1. Wash them in hot water  If your jeans have become a little stretched, simply run them through a regular wash cycle on the highest setting. If your jeans are made of a denim that is as near to 100 percent cotton as possible, this procedure will work best. A must caution for you, “do not use fabric softener.” 2. Put them in the dryer on a hot setting Put your denim in the dryer on the hot setting once you’ve finished washing them on a hot cycle. Because of the heat, the fibers in the denim will compress and this will make your jeans tighter than they were before.  Sew a small piece of elastic onto the back of the waistband If the waistline on your pants is a little too big, try this simple trick: Sew a six-inch length of fabric shop elastic into the inside of your rear waistband. Watch the magic by following this helpful technique with good stitching. (Best if you can do it with your own sewing machine.) If the Jeans Are Too Tight Spray them with lukewarm water, then pull to stretch This is the simplest method for stretching out a pair of pants that have shrunk. Spray the jeans with lukewarm water before laying them out on the floor. While the jeans are wet, stand on each leg, lean down, and manually pull and stretch the pants with your hands. Pull them in any direction you like, you can reapply the lukewarm water as needed.  Sit in a warm bath while wearing the jeans This one may seem a little out there, but it works. Put on your too-tight jeans, fill a bath with warm water, and relax. The threads will loosen and stretch a little with the warm water. You’ll obviously need to do this ahead of time; when you finish, hang the jeans to dry. Carefully remove the waistband This is a more complicated approach, but it’s fantastic if you want to get crafty. Rip your jeans’ side seams about two to three inches down, then cut the waistline in the same spot. Then, to widen the waist of your jeans, you

How to Stretch Denim : Denim Stretching Hacks in 2024 Read More »

how to thread a sewing machine

How to Thread A Sewing Machine : Step by Step Guideline in 2024

How to thread a sewing machine? Do you have the same question? Alright! You don’t need to worry my friend! Just go through the whole article. Here we have discussed how to thread a sewing machine step by step. You have to learn first, how to use a sewing machine to thread it. Get out your sewing machine and try to sew again. Yes, it appears to be a good concept, but remember when was the last time you did some machine sewing or sat down and learned how to thread a sewing machine. The most basic step is to know how to thread your sewing machine correctly. So at first, dust off your machine and then get ready to sew all over again. Add some helpful hints to make the process go more smoothly and then your relationship with your sewing machine would be transformed in a better way.  Have a look at this table of contents:  HOW TO THREAD A SEWING MACHINE Before You Start  If you have one, start by looking through your sewing manual. It should include diagrammatic instructions for threading your specific machine. If you’ve misplaced your manual, check out this post for links to online sewing machine manuals. Fill the bobbin with the color thread you want to use. Select high-quality threads such as Rasant, Gutterman, or Coates. Your thread should be appropriate for the fabric you’ve chosen.  HOW TO THREAD A SEWING MACHINE IN 10 EASY STEPS Step 1: Top Spool Place the cotton on the spool at the machine’s top. This could be an upright or a lying down peg, depending on your machine. Your sewing machine may come with a plastic disk to place on top of the spool to keep it in place and prevent it from flying off once you begin sewing. Step 2: Thread Guide Pull the thread through the thread guide on the top. This brother machine has a rather large guide. Often the guide will be a small button-like knob. Step 3: Around the Tension Knob Pull the thread down and loop it around the tension discs below. Step 4: Second Thread Guide Then pull the thread back up again into the second thread guide. This will have a lever with an eyelet, generally called the take-up lever. This creates a U shape with the thread.                                                                                                                                     Step 5: Above Needle Hook Follow any hooks to hold the thread, bring the thread down to the needle. Step 6: Thread the Needle After that, thread the needle from front to back. We’ll share the tips further if you’re having difficulties threading the needle.  Step 7: Insert Bobbin Load your wound bobbin according to the manual and your bobbin type. The bobbin may be inserted from the front or from the top of your machine. Some machines feature a removable case into which the bobbin is inserted, while others have the bobbin drop straight down into a permanent location. Turn the flywheel (the large wheel on the right side of the machine) towards you so that the needle connects the top and bottom threads. Bring the thread from the bobbin to the machine plate’s top, where the needle is moved in and out.  Step 8: Join the Bobbin and Top Thread Find the bobbin thread loop that is caught and pull it to the top. To grip it, you may need tweezers or a pin. Step 9: Pull the Threads to the Back Pull both threads back to the back. As you pull them, they should be able to run around freely. Step 10: Test on a Scrap Check your stitches and tension on a scrap of fabric. As you begin sewing, gently hold the threads at the rear to avoid tangles between the top and bottom threads. Remember to lower the foot to connect with the feeding mechanism and keep the cloth stable. HOW TO THREAD A SEWING MACHINE – EXTRA TIPS The only other obstacle can be threading the needle once you’ve mastered the basics of threading. What could be simpler than threading a strand of cotton through a needle’s eye?  In general, it’s a straightforward task, but the sewing machine needle isn’t free to be held up to the light, closer to your point of vision, or further if you’ve reached the period of life where you require reading glasses! Your machine’s little needle with a little eye is connected to it and inserted into a socket. It is the last stage in the threading of a sewing machine. Helpful tips on how to thread a machine needle: ‘Threading the needle’, is actually a very significant term for some moves in action sports. Hopefully it won’t be that dangerous, but there is just a chance to bring you closer to the excitement of starting something new.  So get ready for action and a new season of sewing with your sewing machine threaded correctly!  MORE TROUBLESHOOTING  If after you have learned how to thread a sewing machine you are still having some problems with the machine sewing properly, there are some troubleshooting contents that might help you that you will find online.  Beautiful connection group uses the best sewing machines to stitch their products. They are a professional wholesale clothing manufacturing company in the USA specialized in custom women’s apparels like coats, jackets, tops and dresses. Company grew alongside their customer base. They work to serve you at their best.

How to Thread A Sewing Machine : Step by Step Guideline in 2024 Read More »

clothing sample makers

Clothing Sample Makers : Finding Clothing Sample Makers in 2024

If you’re looking for clothing sample makers or pattern maker, you’ve probably already learned that finding a sample maker or a pattern maker isn’t as simple as it may appear. Why?  Simply because there are over a million! There are different types of samples to choose from. That’s simply too many for many tiny fashion businesses and startups.  In this article, we will discuss regarding clothing sample makers that might help you. What Does a Clothing Sample Maker Do?  A clothing sample maker, in the broadest sense, is someone who makes/remakes an item of clothing based on another sample or design. The uncertainty stems from where they are in the process when they are doing this activity. At one extremity of the range is a sample maker who takes concepts from a designer’s head and turns them into an actual garment. On the other hand, a sample maker is who is creating a production sample for a factory utilizing a tech pack and a sample from the label. These are frequently used as a point of reference or to show a client that the factory can, in fact, accomplish the desired output. Between those two are sample makers, which may perform a wide range of jobs. In addition, there is a wide range of pricing options. Let’s imagine you have a fresh bikini design in mind and you’re looking for a swimwear sample maker to help you bring it to reality. You’ve got some sketches, some inspiration photos, and a good notion of how it should appear in your head. You’re on the lookout for a bikini sample manufacturer now. While it may appear to the novice to be an easy chore, it is not. The clothing sample makers must do the following:  Then, for each, they must repeat numerous of the steps. That’s a lot of effort! All of this has to withstand the client’s intense inspection in some way. To the sample maker’s chagrin, the client frequently expects to spend no more for the item than it would have cost on the store shelf. Even at a 3-5x markup from the manufactured cost (which is a typical sample price from a manufacturer), the clothing sample makers cannot afford to do that much of the front-end work for such a small margin. This issue cannot be blamed on a client who is just beginning his clothing line. It can be difficult to grasp how it works if you haven’t done it before. So, the consumers start to believe he or she is being underserved, and the provider believes they are being underpaid.  Let’s Simplify!  Let’s break it down a little and apply some new definitions to make things easier. We utilize a variety of terminology in our firm to facilitate communication with our clients. We don’t refer to all of the previous designs as “samples.” This is known as “prototyping.” One of the procedures used in “product development” is prototyping. As a result, we work through prototypes as we design a fashion product for a client. Prototype v1 is created when a client brings in an early stage prototype of their own design. The number just fluctuates as we work through more prototypes to represent our progress. v1, v2, v3, v4, v5, v6, v7, v8, v9… Prototyping is a step in the designing process, according to our terminology.  We use the term “sample” after completing the prototyping process. A sample, on the other hand, is a replica of a final prototype. For both of us, this makes things easier. It’s not a good idea to make samples while the design is still being worked on. It would result in duplication of mistakes that have not yet been resolved. Everyone has a better understanding of the status of the item once we start using the term sample. Samples are then used as reference materials rather than being used in the designing process. Back to the Search So, let’s get back to work. Are you looking for someone to produce clothes samples for you? Or are you more interested in a product development service that can assist you with prototyping your design? The further you get in your own process, the lower your moving forward costs will be. So pick wisely and be honest with yourself about your requirements.  Because our services are largely based in the USA. We receive a lot of requests from people looking for a clothes sample maker in the USA. For the cheap cost of a sample, many of these clients want comprehensive prototyping services. They frequently expect that a tailor will meet their needs, and the costs of a tailor here are quite expensive. They rapidly discover, however, that it is a much different situation than they had anticipated. The tailor will just make a replica of the design or their best interpretation of it, and that will be the end of it. The project is now complete. When a client wants to make modifications and doesn’t expect to compensate for the extra time, the tailor becomes confused and frustrated. In the mind of the sample maker, they’re merely manufacturing a single wearable thing. Therefore the tailors aren’t suitable to prepare a design for large-scale production.  So, our recommendation is to look for a service that best meets your actual needs as well as your realistic budget. If you’re on a limited budget, invest the money in a sewing machine and learn how to operate it. Early-stage fees will cost you a lot of money, thus you’ll save a lot of money. Alternatively, look for a clothes sample maker among your relatives and friends. Further collaborate with them to develop your prototype before going on to the next step.  Working with a Fashion Product Developer Working with a fashion product development firm is your best option if you have a business idea and some money to invest. A fashion product developer is much more than a garment sample maker. A good product developer will

Clothing Sample Makers : Finding Clothing Sample Makers in 2024 Read More »